Designing for Failure — Blast Radius, Timeouts, Breakers & Bulkheads
Assume failure is the default state
The junior mental model is "it works, and sometimes fails." The senior model is inverted: at scale, something is always failing — a disk, a node, a dependency, a network link. So the design question is never "if this dependency is down" but "when it's slow or down, what happens to everything that depends on it?" Get that wrong and one slow service cascades into a full outage.
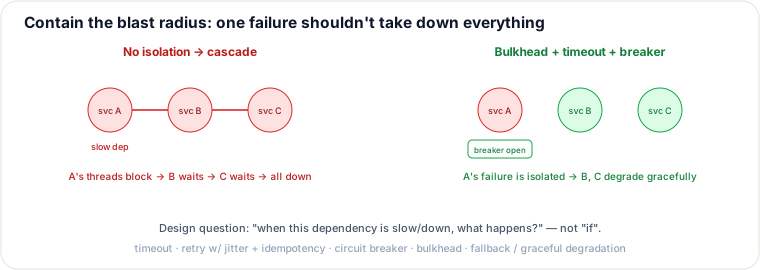
The cascade, and how to contain it
The classic failure: service A calls a slow dependency; A's request threads all block waiting; the thread pool exhausts; now A is down for everyone, and B (which calls A) blocks too — the failure propagates backwards.
How fast does the pool die? One multiplication. Pool = 200 threads, traffic = 100 req/s, dependency hangs with no timeout (TCP's default gives ~30 s holds). Threads pinned = arrival rate × hold time (Little's Law, L = λW) → the pool is fully consumed in 200/100 = 2 seconds. Same numbers with a 1 s timeout: steady state pins 100 × 1 = 100 threads — degraded but alive. The timeout isn't politeness; it is the one term in that equation you control. (This is the same L = λW that sizes bounded queues in Back-pressure & Flow Control.)
The defenses, each answering a failure question:
| Defense | Stops | Cost / when it hurts |
|---|---|---|
| Timeout (always set one) | waiting forever on a slow dependency | Too tight → false trips during normal GC pauses or jitter. Size from the dependency's measured p99, not from the caller's total budget. |
| Retry with backoff + jitter (+ idempotency!) | transient blips — but jitter prevents a retry storm (thundering herd) | Without jitter, retries synchronize and amplify the outage; without idempotency, retries duplicate side effects. |
| Circuit breaker | hammering a dependency that's already down; fail fast, recover when healthy | Hides slow-burn degradation; adds state-machine complexity; mis-tuned thresholds hide real problems. |
| Bulkhead (isolate resource pools) | one slow dependency exhausting all threads — partition them so failure is contained | Lowers total throughput and can strand capacity in an under-used pool. |
| Graceful degradation / fallback | a total outage — serve stale cache or a reduced feature instead of an error | Stale data and reduced UX; users may not notice the fallback until a later complaint. |
| Load shedding | collapse under overload — reject excess early to protect the core | Lost revenue and angry users; needs careful prioritization (e.g., paid users before free tier). |
The retry-storm trap
Naive retries make outages worse: a struggling service gets 3× the load from retries, plus every client retrying in lockstep (synchronized). Always: cap retries, exponential backoff, random jitter, and only retry idempotent operations.
This is also a design question for every dependency: "what's my timeout, my retry policy, and my fallback when this is down?" If you can't answer it, you have an outage waiting.
When a defense becomes the outage: the 50 ms timeout
A team sets a 50 ms timeout to a dependency "to be safe." The dependency's measured p99 is 45 ms, but during a routine GC pause it briefly hits 70 ms. Because the timeout was sized from the caller's total budget instead of the dependency's actual latency distribution, every caller trips at once, returns errors to its own callers, and the outage propagates backwards. A timeout sized from the dependency's p99 (e.g., 100 ms with a fallback) would have absorbed the GC pause and avoided the cascade.
Takeaways
- Failure is the default; design for "when," not "if." Ask of every dependency: timeout? retry? fallback?
- Contain blast radius: timeout + circuit breaker + bulkhead + graceful degradation + load shedding.
- Retries need backoff + jitter + idempotency, or they amplify the outage.
Re-authored for this guide; blast-radius diagram hand-authored as SVG. Follows Release It! (Nygard) and the Google SRE Workbook. See also: the microservices resilience patterns (circuit breaker, bulkhead, retry), Rate Limiting (load shedding), Replication (failover).
When NOT to over-apply resilience patterns
- Do not wrap every call in retry without idempotency — amplify outages and duplicate side effects.
- Do not set circuit breakers so sensitive that brief blips permanently open (need half-open + metrics).
Interviewer follow-ups & drills
- Why timeouts everywhere? Without timeouts, threads pile up and fail worse than a clean 504.
- Ops: error budget burn, dependency p99, retry rate, circuit open count.
- Drill: dependency at 5% error — does retry×3 self-DDoS? At an independent 5% error rate, no: retries add only 0.05 + 0.05² + 0.05³ ≈ 5.3% extra load — harmless. The self-DDoS happens when the errors are caused by overload: retries add load → the error rate rises → more retries — a feedback loop that converges on 4× offered load (1 + 3 retries per request) against a service that is already saturated. That is why the fix is a retry budget (cap retries at e.g. ≤10% of requests, as in gRPC/Google SRE retry budgets), not just backoff: a budget breaks the loop; backoff only slows it.
🤖 Don't fully get this? Learn it with Claude
Stuck on Designing for Failure — Blast Radius, Timeouts, Breakers & Bulkheads? Open Claude, copy a block below, and it'll teach you this exact concept — visually and interactively.
Build the mental picture, not memorization.
I just read a lesson on **Designing for Failure — Blast Radius, Timeouts, Breakers & Bulkheads** (System Design) and want to truly understand it. Explain Designing for Failure — Blast Radius, Timeouts, Breakers & Bulkheads from first principles using ONE vivid real-world analogy and a visual mental model — draw it as ASCII art or a clear step-by-step diagram — with a concrete example using real numbers. Then ask me one question to check I got the mental picture, and wait for my reply. If you're unsure or a claim isn't standard, say so and reason from first principles instead of guessing.
Socratic — adapts to where you're stuck.
Teach me **Designing for Failure — Blast Radius, Timeouts, Breakers & Bulkheads** interactively. Ask me ONE guiding question at a time, wait for my answer, and adapt to my confusion — build the idea with me step by step instead of explaining it all at once. If you're unsure or a claim isn't standard, say so and reason from first principles instead of guessing.
Active recall exposes what you missed.
Quiz me on **Designing for Failure — Blast Radius, Timeouts, Breakers & Bulkheads** with 5 questions, easy to tricky, ONE at a time. Tell me if each answer is right; at the end, explain clearly what I got wrong and why. If you're unsure or a claim isn't standard, say so and reason from first principles instead of guessing.
Intuition + hook + flashcards for long-term memory.
Help me remember **Designing for Failure — Blast Radius, Timeouts, Breakers & Bulkheads** for the long term: give the one-sentence intuition, a memorable hook/mnemonic, a tiny worked example, and 3 active-recall flashcards (Q -> A). If you're unsure or a claim isn't standard, say so and reason from first principles instead of guessing.