Resilience and Error Handling
Resilience and Error Handling
Resilience and error handling minimize the impact of failures and let a system recover gracefully from the unexpected. Four techniques do most of the work in a distributed system: fault tolerance (redundancy so failures don't take down the whole system), graceful degradation (serve less rather than serve nothing), retry and backoff (recover from transient failures without making them worse), and chaos engineering (deliberately break things to find weaknesses before real outages do). None of these is free — each trades complexity, and sometimes availability, for safety. The sections below cover the mechanisms in enough detail to implement them, and just as importantly, when each one is the wrong tool for the job.
A. Fault Tolerance
Fault tolerance is the ability of a system to keep functioning correctly in the presence of faults. It is built from redundancy at multiple levels — data (replicas), services (multiple instances behind a load balancer), and nodes (spread across racks, zones, or regions) — combined with replication, sharding, and load balancing so that losing any single piece degrades capacity rather than availability.
B. Graceful Degradation
Graceful degradation is what happens when a component does fail: instead of the whole request failing, the system keeps serving reduced functionality. A product page that cannot reach the recommendations service still renders the product, just without a "you might also like" rail. The mechanisms that make this possible are covered next: circuit breakers stop calling a dependency that is already struggling, timeouts bound how long you wait for it, and fallbacks give the caller something reasonable to return instead of an error.
Circuit Breaker: Mechanism
A circuit breaker sits in front of a downstream dependency and tracks a rolling window of the last N calls (say N = 10). It does not evaluate the failure-rate threshold from the very first call — it first checks a minimum-calls gate: while the window holds fewer calls than a configured minimumCalls (commonly set equal to the window size, e.g. 10), there is not enough signal to distinguish a real failure spike from ordinary noise, so the breaker stays CLOSED no matter how high the failure rate looks over those few samples.
Once the window holds at least minimumCalls calls, the breaker evaluates on every subsequent call: if the failure rate over the window is at or above the configured threshold (e.g. 50%), it trips to OPEN immediately. While OPEN, calls fail fast without touching the downstream at all, for a cooldown period. When the cooldown elapses, the breaker moves to HALF_OPEN and allows a small number of probe calls through; if enough of them succeed, it resets the window and returns to CLOSED, and if any fail, it goes straight back to OPEN.
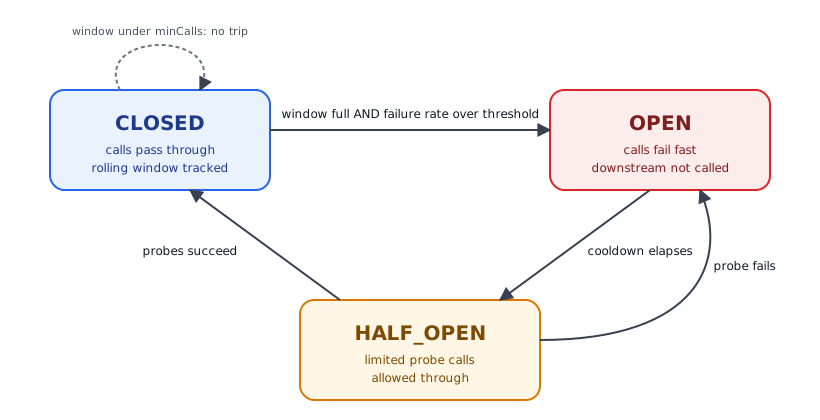
Worked trace
Window size 10, minimumCalls = 10, threshold 50%. Calls arrive in order; "S" is success, "F" is failure.
| Call # | Result | Failures / size so far | Outcome |
|---|---|---|---|
| 1 | S | 0/1 | pass — window not full yet |
| 2 | F | 1/2 | pass — window still under 10 |
| 3 | F | 2/3 | pass — window still under 10 |
| 4 | S | 2/4 (50%) | pass — window still under 10, gate not met |
| 5 | F | 3/5 (60%) | pass — window still under 10, gate not met |
| 6 | F | 4/6 (67%) | pass — window still under 10, gate not met |
| 7 | S | 4/7 (57%) | pass — window still under 10, gate not met |
| 8 | F | 5/8 (63%) | pass — window still under 10, gate not met |
| 9 | S | 5/9 (56%) | pass — window still under 10, gate not met |
| 10 | F | 6/10 (60%) | gate met (size = 10) and 60% at or above 50% — trip to OPEN |
Calls 4 through 9 already exceed the 50% failure-rate threshold on their own, but the breaker does not trip on any of them, because the minimum-calls gate from the mechanism above has not been satisfied yet — there simply are not enough samples to act on. Only call 10, which both fills the window to size 10 and sits at or above 50%, causes the trip.
When (Not) to Use a Circuit Breaker
A circuit breaker is not the default answer to "a call might fail." It is the right tool when a dependency call is expensive to wait on (multi-hop, slow to fail, ties up a thread or connection-pool slot) and when failing fast protects the caller's own resources from being exhausted by a downstream that is already struggling. It is the wrong tool for cheap, idempotent calls — a cache read, a feature-flag check, a local config lookup — where a plain timeout plus a couple of local retries is both simpler and cheaper: the state-machine bookkeeping, window tracking, and threshold tuning a breaker needs are not worth it when the call barely costs anything to retry.
Local retry is also cheaper than a breaker when failures are genuinely transient and independent — a single dropped packet, one slow garbage-collection pause. A couple of retries with small backoff resolve that without any shared state. Tripping a breaker for a one-off blip is actively worse: the OPEN cooldown blocks legitimate calls too, so you have traded one failed request for a window of unavailability. Breakers earn their complexity when failures are correlated and sustained — the downstream is actually degraded, not just unlucky once — and when many callers hitting a failing dependency at the same time would otherwise create a retry storm that makes the outage worse.
Circuit breaker vs. the other resilience levers
| Technique | Protects against | Scope | Main cost / trade-off |
|---|---|---|---|
| Circuit breaker | A specific dependency that is failing or slow | Per dependency, per caller | State tracking and threshold tuning; a badly tuned threshold trips on noise or never trips at all |
| Bulkhead | One slow dependency starving resources needed by others | Per dependency, resource pool (threads/connections) | Must size each pool; idle pools waste capacity, undersized pools throttle healthy traffic |
| Load shedding | The service itself being overloaded, regardless of which dependency is at fault | Whole service, by request priority | Needs a priority scheme; dropping the wrong requests looks like an outage to those users |
| Rate limiting | A client or caller consuming more than its fair share | At the edge, per client/API key | Needs quota design; too strict and it throttles legitimate bursty clients |
These are not mutually exclusive — a well-defended API gateway typically layers them: rate limiting at the edge to keep any one client from overwhelming shared capacity, bulkheads to stop one dependency's slowness from starving others, circuit breakers around each unreliable dependency so callers fail fast instead of piling up, and load shedding as the last-resort valve when the whole service is saturated regardless of cause.
C. Retry and Backoff Strategies
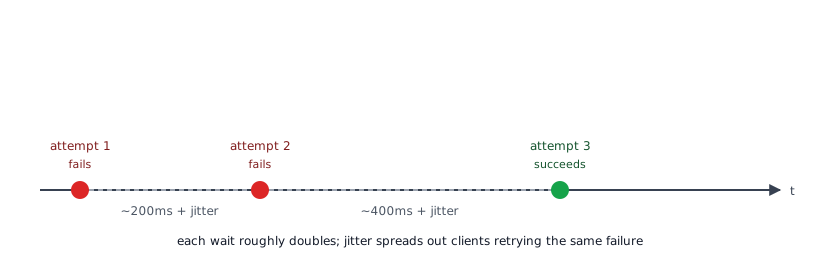
Transient failures — a dropped connection, a momentary timeout, a brief 503 — are common in distributed systems. Retrying immediately just adds more load to a system that is already struggling, so retries are paired with backoff: wait longer between each attempt (exponential backoff), and add randomness (jitter) so that many clients retrying the same failure do not all retry in lockstep and create a synchronized thundering herd against the recovering service.
Jitter deserves a formula, not just an adjective. Full jitter (the AWS Builders' Library recommendation): sleep = random(0, min(cap, base × 2^attempt)). With base 100 ms and cap 10 s, attempt 3 sleeps a uniform random value in [0, 800 ms] — and the spread is the point: N clients that failed together now retry across the whole window instead of stampeding at exactly 800 ms. Equal jitter (half fixed, half random: sleep = backoff/2 + random(0, backoff/2)) keeps a guaranteed minimum wait when you cannot tolerate near-immediate re-tries. Compare either against no-jitter exponential backoff, which synchronizes retries into waves exactly aligned with the original failure — the AWS Builders' Library article "Timeouts, retries, and backoff with jitter" includes the simulation showing full jitter minimizes both total work and completion time.
Two guardrails matter as much as the backoff curve itself: retries should only be attempted on operations that are safe to repeat (idempotent, or made idempotent with an idempotency key), and there should be a retry budget — a cap on total retries in flight or per time window — so a widespread outage does not turn into an amplified one where every failed call spawns two or three more.
Retries and timeouts are two halves of the same budget, and the timeouts must be nested and strictly decreasing down the call stack. If the client allows 3 s, the gateway's call to a service should time out well under that (say 1.5 s), and the service's call to its database under that again (say 500 ms) — each layer needs enough margin to detect its downstream's failure, retry if appropriate, and still return an error to its own caller before that caller's deadline expires. Flatten the hierarchy — give every layer the same 3 s — and a dead backend makes the gateway hold the connection open for the client's entire budget before failing, converting one slow dependency into exhausted gateway threads and a stalled client. The rule of thumb: an outer timeout must exceed the inner timeout plus the time its retries can consume, or the retry never actually gets a chance to run.
D. Error Handling and Reporting
Proper error handling and reporting are what make the techniques above actionable rather than invisible. Consistently logging errors with correlation IDs, categorizing them (client error vs. dependency failure vs. bug), and alerting on the categories that matter lets you find and diagnose problems quickly instead of learning about them from user complaints. Feeding that same error data into monitoring and observability dashboards is also what tells you whether a circuit breaker's threshold is well tuned or a retry budget is being exhausted before you would otherwise notice.
One anti-pattern is worth calling out explicitly: never mask a failure as a success. Returning 200 OK with an empty or partial body when a downstream actually failed breaks every caller that keys retry/alert logic off the status code — clients treat the empty payload as valid, caches store it, and the failure becomes invisible until it surfaces as corrupt data downstream. Map upstream failures to honest status codes (502/503/504 for dependency failures, 429 with Retry-After when shedding or rate-limiting) so the client's own resilience logic can react correctly.
E. Chaos Engineering
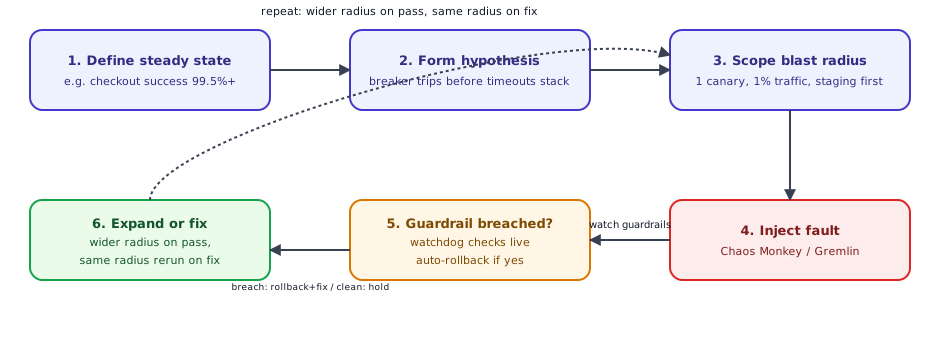
Chaos engineering is the practice of intentionally injecting failures into a system to test its resilience and find weaknesses before they show up as real outages. Run undisciplined, "randomly break things in production" is just as likely to cause an outage as to prevent one — what makes it useful is running it as a closed loop with an automatic off switch, not a one-off stunt.
- Define steady state. Pick a measurable indicator of normal behavior, e.g. checkout success rate at or above 99.5% and p99 latency at or below 400ms.
- Form a hypothesis. State what should happen under a specific failure, e.g. "if Payment's latency degrades, the gateway's circuit breaker trips before user-facing requests start timing out."
- Scope the blast radius. Start at the smallest reversible unit — one canary instance, 1% of traffic, in staging or an off-peak window — before ever touching full production traffic.
- Inject the fault. Use a tool like Chaos Monkey (randomly terminates instances or processes) or Gremlin (precise, targeted attacks) to, for example, add 300ms latency or a 20% error rate to Payment, while watching both the steady-state metric and guardrail metrics (error-budget burn, signs of cascading failure in other services) in real time.
- Automatic rollback. The instant a guardrail metric breaches its threshold — say checkout success rate drops below 98% — an automated watchdog aborts the experiment and reverts the injected fault immediately, without waiting for a human to notice. The point of the experiment is to discover unknown failure modes safely, not to cause the outage it is trying to prevent.
- Expand or fix, then repeat. If the system absorbed the fault as hypothesized — the circuit breaker tripped, a fallback served degraded content, nothing cascaded — widen the blast radius (10% of traffic, then a full region) to gain confidence at larger scale. If it did not, the experiment just found a real weakness: add the missing timeout, retune the threshold, add a bulkhead, then rerun the same small-blast-radius experiment before widening further.
That loop is what turns Chaos Monkey or Gremlin from "randomly break things" into a repeatable verification technique: blast radius only grows after the smaller radius has already passed, and any breach rolls back automatically rather than paging someone at 3 a.m.
Sources
Original lesson: "Resilience and Error Handling" in the API Gateway module of the System Design track. The circuit-breaker and bulkhead treatments follow Michael T. Nygard, Release It!, 2nd ed. (Pragmatic Bookshelf, 2018); retry, backoff, and jitter guidance follows the AWS Builders' Library article "Timeouts, retries, and backoff with jitter"; the chaos-engineering loop follows the Principles of Chaos Engineering (principlesofchaos.org) and Basiri et al., "Chaos Engineering", IEEE Software 33(3), 2016.
🤖 Don't fully get this? Learn it with Claude
Stuck on Resilience and Error Handling? Open Claude, copy a block below, and it'll teach you this exact concept — visually and interactively.
Build the mental picture, not memorization.
I just read a lesson on **Resilience and Error Handling** (System Design) and want to truly understand it. Explain Resilience and Error Handling from first principles using ONE vivid real-world analogy and a visual mental model — draw it as ASCII art or a clear step-by-step diagram — with a concrete example using real numbers. Then ask me one question to check I got the mental picture, and wait for my reply. If you're unsure or a claim isn't standard, say so and reason from first principles instead of guessing.
Socratic — adapts to where you're stuck.
Teach me **Resilience and Error Handling** interactively. Ask me ONE guiding question at a time, wait for my answer, and adapt to my confusion — build the idea with me step by step instead of explaining it all at once. If you're unsure or a claim isn't standard, say so and reason from first principles instead of guessing.
Active recall exposes what you missed.
Quiz me on **Resilience and Error Handling** with 5 questions, easy to tricky, ONE at a time. Tell me if each answer is right; at the end, explain clearly what I got wrong and why. If you're unsure or a claim isn't standard, say so and reason from first principles instead of guessing.
Intuition + hook + flashcards for long-term memory.
Help me remember **Resilience and Error Handling** for the long term: give the one-sentence intuition, a memorable hook/mnemonic, a tiny worked example, and 3 active-recall flashcards (Q -> A). If you're unsure or a claim isn't standard, say so and reason from first principles instead of guessing.