The Circuit Breaker Pattern An Effective Shield Against Cascading Failures
A circuit breaker wraps every call to a remote dependency, keeps a running count of recent failures, and once those failures cross a threshold it trips open and fails the next calls instantly for a cooldown window instead of forwarding them — so a slow or dead dependency can no longer tie up the caller's finite threads and connections and drag the whole caller down with it. The core insight is that in distributed systems slow is worse than down: a dependency that hangs for 10s per call silently consumes the caller's worker threads until the caller itself stops serving unrelated traffic. The breaker's job is to convert those slow failures into fast failures.
The three states and the per-call check
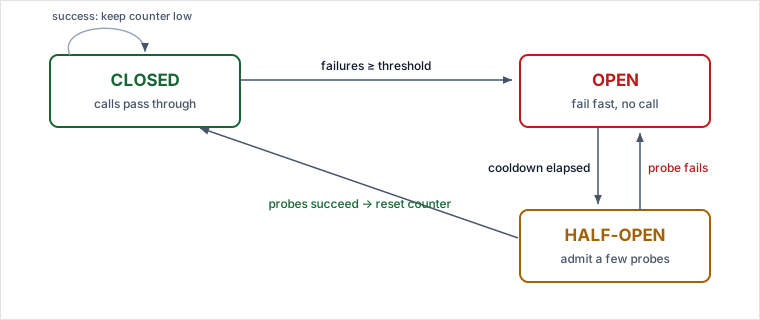
The breaker is a small state machine that sits in front of the call. Every request first checks the state, cheaply, before any network I/O happens:
- Closed — the normal state. Calls pass through to the dependency; each outcome updates the failure counter. Enough failures in the window trip it open.
- Open — the dependency is presumed unwell. Calls are not attempted; they return immediately with an error or a fallback, in microseconds. A cooldown timer runs.
- Half-Open — after the cooldown, the breaker admits a small number of trial probe calls. If they succeed, it closes and resumes normal traffic; if a probe fails, it reopens and restarts the cooldown.
The state diagram below shows the full loop — Closed → Open → (cooldown) → Half-Open → Closed, with a fast path back to Open if a probe fails:
A worked example, traced
Take an OrderService that calls a PaymentService, guarded by a breaker configured: trip after 5 consecutive failures, cooldown = 30s, half-open admits 3 probes, and close only if all 3 succeed (any probe failure reopens and restarts the cooldown). Traffic is ~200 req/s. At t = 12s the Payment DB connection pool saturates and Payment starts rejecting connections immediately — each attempt fails with connection-refused in ~3ms, so failures surface at once rather than after a timeout.
| Time (s) | Event | Breaker action | State after |
|---|---|---|---|
| 0.000 | call to Payment succeeds | forward; failures = 0 | CLOSED |
| 12.000 | call fails (connection refused) | failures = 1 | CLOSED |
| 12.004 | call fails (connection refused) | failures = 2 | CLOSED |
| 12.007 | call fails (connection refused) | failures = 3 | CLOSED |
| 12.010 | call fails (connection refused) | failures = 4 | CLOSED |
| 12.013 | call fails (connection refused) | failures = 5 → trip; openUntil = 42.013 | OPEN |
| 12.013–42.013 | ~6,000 calls arrive | short-circuit; return fallback in <1ms; Payment never touched | OPEN |
| 42.013 | next call | enter HALF-OPEN; admit probe #1 → 120ms OK | HALF-OPEN (1/3) |
| 42.140 | probe #2 | OK | HALF-OPEN (2/3) |
| 42.260 | probe #3 | OK → close; failures = 0 | CLOSED |
| 42.300 | full traffic resumes | normal | CLOSED |
The alternate branch: if probe #1 at 42.013 had failed, the breaker would reopen immediately with openUntil = 72.013 (cooldown restarts) and probes #2/#3 would never be admitted.
Why this matters — the latency contrast. Fast rejections are the kind failure mode. Now suppose Payment instead hangs — the worse case — and OrderService has no breaker: each call that grabs a worker thread blocks it for the full 10s per-call timeout. Threads are consumed at 200 req/s and none come back inside the window, so a 200-thread pool empties in 200 ÷ 200 = 1s of saturation, and now the OrderService can't serve anything — including requests that never touch Payment. That is the cascade. With the breaker open, all ~6,000 calls in the outage window return in <1ms and the worker threads stay free for other work.
Integration: a wrapper, not a rewrite
You don't restructure the system to adopt a breaker. You wrap the outbound call. Every request to the dependency goes through the breaker object, which decides whether to forward based on current state and recent outcomes:
Response placeOrder(Order o) {
    return paymentBreaker.execute(
        () -> paymentClient.charge(o),   // the real call
        () -> Fallback.queueForRetry(o)   // fallback when OPEN / on failure
    );
}
Because it's a wrapper, you roll it out incrementally — start with the calls whose failure would hurt most (payments, auth), then expand. The three knobs to set are the failure threshold (how many/what fraction of failures trip it), the cooldown / open timeout (how long to wait before probing), and the half-open probe count (how many trial calls decide recovery). Libraries like Resilience4j and (historically) Hystrix implement all three.
Tuning under load — and why “shorten the timeout” is usually wrong
A common piece of advice is: “under high demand, shorten the cooldown so the breaker attempts recovery sooner and can handle more requests.” This is usually backwards. The cooldown is how long you wait before sending a probe into a service you believe is sick. Shortening it makes the breaker probe a still-unwell dependency sooner; if it hasn't drained its backlog, the probe fails, the breaker reopens, and you've added probe load to an overloaded service while gaining nothing. Quicker probing does not make a saturated service handle more requests — it just re-hammers it.
The levers that actually help under sustained load:
- Lower the failure threshold (trip sooner) so you stop hammering the failing dependency and shed load earlier — this is the real “handle more requests” win, because freed threads serve other work.
- Keep or lengthen the cooldown when recovery is slow (process restart, backlog drain, cache warm-up) so the probe hits a service that has genuinely recovered.
- Shorten the cooldown only when you have evidence recovery is fast and transient — a brief GC pause, a leader re-election — where quick re-probing restores availability without piling on.
- Admit very few half-open probes (often just 1) so a premature probe can't itself re-tip a fragile service.
Rule of thumb: match the cooldown to how long the dependency actually takes to get well, not to how badly you want it back.
Pitfalls
- Per-instance state hidden behind a load balancer. An in-process breaker only sees its own instance's calls. With 50 replicas, each has its own counter — so a recovering dependency can receive up to 50 simultaneous half-open probes, and your “5-failure” threshold is really per-instance. Add jitter to probe timing, or use a shared/coordinated breaker for shared-fate dependencies.
- Counting the wrong failures. Tripping on 4xx/validation errors (the client's fault) opens the breaker for a perfectly healthy dependency. Count only signals that the dependency is unwell — timeouts, connection-refused, 5xx, pool exhaustion — not business errors.
- Half-open thundering herd. Admitting many probes at once, or every instance probing on the same schedule, can re-kill a service the instant it comes back. Admit one, add jitter.
- No per-call timeout under the breaker. The breaker trips on failures, but if the wrapped call has no timeout, the very first burst of slow calls still exhausts the thread pool before enough failures accumulate to open it. A breaker without a timeout is a false sense of safety.
- Slow-failure blind spot. A threshold that counts only exceptions misses a dependency that's “up” but 20× slower. Trip on latency too (e.g. Resilience4j's
slowCallRateThreshold). - Fallbacks that mask data loss. Returning a cheerful default (empty cart, “no results”) can silently corrupt user experience or downstream writes. Fallbacks must be semantically safe, not just non-throwing.
When to use it — and when not to
Reach for a circuit breaker when a remote, out-of-process dependency can fail or slow independently, callers run on a bounded resource (thread pool, connection pool, event loop), and a struggling dependency would otherwise back up and take the caller down. Strong signals: synchronous fan-out to many downstreams, deep call chains, a dependency with variable latency, or a history of one service's outage cascading outward.
Don't reach for it when the call is in-process/local (no independent failure domain to protect against), the work is a one-shot batch job where failing fast buys nothing, or the failure is a rare transient blip better absorbed by a single retry.
Trade-offs vs named alternatives
- vs Retry with backoff + jitter: retries fix transient, independent failures (a dropped packet, one bad node); they actively harm an overloaded dependency because they multiply load and accelerate the meltdown. Choose retry for isolated transients; choose the breaker to protect a struggling dependency. In practice combine them — retry inside, breaker outside — and never retry while the breaker is open.
- vs a plain Timeout: a timeout bounds one call's latency but does nothing to stop you launching thousands more doomed calls. The breaker stops launching them. A timeout is necessary but not sufficient; the breaker sits on top of it.
- vs Bulkhead (a fixed, isolated pool per dependency): the bulkhead caps the blast radius so one sick dependency can't consume all threads, but callers still wait out timeouts within that pool. The breaker fails fast without waiting. They're complementary — bulkhead limits the damage, breaker cuts it off. Prefer bulkhead when you mainly need isolation among many dependencies; prefer the breaker when you need to stop calling one specific failing one; use both for critical fan-out.
- vs Load shedding / rate limiting: those protect the callee from too much traffic; the breaker protects the caller from a bad callee. Opposite direction — often deployed together.
What it costs: extra indirection and state to reason about, a real tuning burden (bad thresholds cause false trips or trips that come too late), the per-instance-vs-shared-state complexity above, and a new failure mode — the breaker itself, plus fallbacks that can hide problems. Choose THIS when a slow or failing remote dependency can exhaust a bounded caller resource and cascade; prefer a bare retry + timeout when failures are rare, transient, independent, and load amplification isn't a concern.
Takeaways
- A breaker converts slow failures into fast failures: it trips on a failure signal, fails fast during a cooldown, then probes — protecting the caller's finite resources, not the callee.
- It is not a substitute for timeouts, retries, or bulkheads — it composes with them (timeout under it, retry inside it, bulkhead beside it).
- Count only failures that mean “the dependency is unwell” (timeouts, 5xx, slow calls), remember state is per-instance unless you coordinate it, and size the cooldown to real recovery time.
- Under load, trip sooner (lower threshold) rather than probe sooner (shorter cooldown) — premature probing just re-hammers a sick service.
L0 · a breaker turns slow failures into fast ones by short-circuiting a sick dependency for a cooldown window.
L1 · ② Failure — “doesn't the breaker itself stop the cascade?”
Trap: “yes — once it's wired in, cascading failure is solved.”
Bar: the breaker only reacts after enough failures accumulate to cross the threshold; every call before that point still blocks a worker thread for the full call latency, so the first burst of slow calls can exhaust the pool before the breaker ever opens. The real fix for the cascade is a per-call timeout underneath the breaker — the breaker then decides whether to keep calling, the timeout decides how long any one call is allowed to hurt you. connects-to: blast radius, timeouts, breakers, bulkheads
L2 · ④ Time/Lifecycle — “cooldown just elapsed, what happens on the next request?”
Trap: “it closes and full traffic resumes.”
Bar: it enters half-open and admits only a small, deliberately limited number of trial probes (often exactly one) before deciding; slamming a barely-recovered service with the full waiting queue the instant cooldown expires is itself a thundering herd, so real breakers admit one probe, require it (or a few) to succeed, and jitter the cooldown so instances don't all probe on the same tick.
L3 · ① Concurrency — “50 replicas behind an LB, each running the breaker — still one clean 5-failure threshold?”
Trap: “the breaker acts as one global switch protecting the whole fleet.”
Bar: an in-process breaker only sees its own instance's calls, so each of the 50 replicas keeps an independent counter and an independent half-open timer — the moment the dependency looks recovered, up to 50 instances can each dispatch their own probe simultaneously, re-tipping a fragile service. Fixing this needs shared/coordinated breaker state or per-instance jitter, not a bigger threshold. connects-to: distributed circuit breakers & detection lag
L4 · ⑤ Adversary/Edge — “the dependency is 100% down but the breaker never trips — why?”
Trap: “lower the failure threshold until it catches it.”
Bar: at low traffic (say 2 requests in the rolling window) a count- or rate-based threshold has no statistical footing — even 100% failing looks like “not enough data” to a naive implementation. Production breakers require a minimum request volume (e.g. Resilience4j's minimumNumberOfCalls) before the failure calculation is trusted at all; below that floor the breaker must default to a safe behavior, not silently stay closed forever. connects-to: circuit breaker vs retry vs timeout
L5 · ⑥ Cost/Simplicity — “we wrapped every outbound call in ONE shared breaker to save the tuning effort — what breaks?”
Trap: “still fine, it isolates the caller from bad dependencies.”
Bar: a shared breaker judges every dependency by everyone else's failures — one flaky, low-priority integration can trip the shared counter and start fast-failing calls to your critical payment API too. Correct scoping is one breaker instance per dependency (ideally paired with a per-dependency bulkhead pool), so blast radius stays limited to the one that's actually sick, at the real cost of N breakers to configure and tune instead of one. connects-to: bulkhead pattern (per-dependency isolation)
The floor keeps dropping: staff+ perturbation beyond L5 — if you coordinate breaker state across instances (L3's fix), that shared store is now a new dependency the caller needs on every call; if it gets slow, you've re-introduced the exact blocking-thread cascade the breaker exists to prevent — who guards the guard?
Self-locate: died at L1 → mid-level; L4+ → staff signal.
Facing any new concept? Hit it with the six: concurrent? failing? at 100×? over time? adversarial? worth the cost? — that's the interviewer's whole playbook.
Sources: Michael Nygard, Release It! (2nd ed., stability patterns — Circuit Breaker and Bulkhead); Martin Fowler, “CircuitBreaker” (martinfowler.com); Microsoft Azure Architecture Center, “Circuit Breaker pattern”; and the Resilience4j and Netflix Hystrix documentation. Re-authored/Deepened for this guide.
🤖 Don't fully get this? Learn it with Claude
Stuck on The Circuit Breaker Pattern An Effective Shield Against Cascading Failures? Open Claude, copy a block below, and it'll teach you this exact concept — visually and interactively.
Build the mental picture, not memorization.
I just read a lesson on **The Circuit Breaker Pattern An Effective Shield Against Cascading Failures** (System Design) and want to truly understand it. Explain The Circuit Breaker Pattern An Effective Shield Against Cascading Failures from first principles using ONE vivid real-world analogy and a visual mental model — draw it as ASCII art or a clear step-by-step diagram — with a concrete example using real numbers. Then ask me one question to check I got the mental picture, and wait for my reply. If you're unsure or a claim isn't standard, say so and reason from first principles instead of guessing.
Socratic — adapts to where you're stuck.
Teach me **The Circuit Breaker Pattern An Effective Shield Against Cascading Failures** interactively. Ask me ONE guiding question at a time, wait for my answer, and adapt to my confusion — build the idea with me step by step instead of explaining it all at once. If you're unsure or a claim isn't standard, say so and reason from first principles instead of guessing.
Active recall exposes what you missed.
Quiz me on **The Circuit Breaker Pattern An Effective Shield Against Cascading Failures** with 5 questions, easy to tricky, ONE at a time. Tell me if each answer is right; at the end, explain clearly what I got wrong and why. If you're unsure or a claim isn't standard, say so and reason from first principles instead of guessing.
Intuition + hook + flashcards for long-term memory.
Help me remember **The Circuit Breaker Pattern An Effective Shield Against Cascading Failures** for the long term: give the one-sentence intuition, a memorable hook/mnemonic, a tiny worked example, and 3 active-recall flashcards (Q -> A). If you're unsure or a claim isn't standard, say so and reason from first principles instead of guessing.