The Bulkhead Pattern A Solution
A bulkhead works by giving each downstream dependency its own fixed pool of a scarce resource — threads, connections, or semaphore permits — so a dependency that hangs can exhaust only its own pool and is forced to fail fast instead of drinking the whole service's capacity dry.
The ship analogy is exact and worth keeping: watertight compartments don't stop a hull breach, they stop one flooded compartment from sinking the vessel. In software the "water" is almost always in-flight concurrency. When you make N services share one thread pool, a single slow dependency silently converts all N into one unit that fails together. The bulkhead re-draws the compartment walls around each dependency.
The subtle point most write-ups miss: the danger is usually latency, not errors. A dependency that throws instantly is nearly harmless — the caller returns and frees its thread. A dependency that answers in 5 seconds instead of 20 ms is the killer, because every request in flight pins a thread for 250x longer, and threads run out.
The mechanism: three ways to partition
All three cap concurrency to a fixed limit; they differ in what does the waiting and whether the call can be interrupted.
- Semaphore bulkhead — a counter of
maxConcurrentCallspermits. The caller's own thread acquires a permit, runs the call, releases. Cheap: no extra threads, no context switch. But the caller thread blocks for the whole call, so the bulkhead alone cannot interrupt a hung call — you must add a timeout inside. - Thread-pool bulkhead — a dedicated executor (e.g. 40 threads + a small queue) per dependency. The caller hands work off and gets a future back, so it can enforce a timeout externally and stay responsive even if the dependency's pool is fully blocked. Cost: context-switch overhead, ~0.5–1 MB stack per thread, and request context (auth, tracing spans,
ThreadLocals) does not automatically cross the thread boundary. - Connection-pool bulkhead — the same idea at the data tier: separate JDBC/HTTP connection pools for different query classes so a slow analytical query can't starve the OLTP path. Constraint: the sum of all pools must stay under the database's
max_connections.
Historically Netflix Hystrix defaulted to thread-pool isolation; Resilience4j defaults to the lighter semaphore bulkhead and offers a separate ThreadPoolBulkhead when you need real isolation of the execution thread.
Worked example: the inventory hang
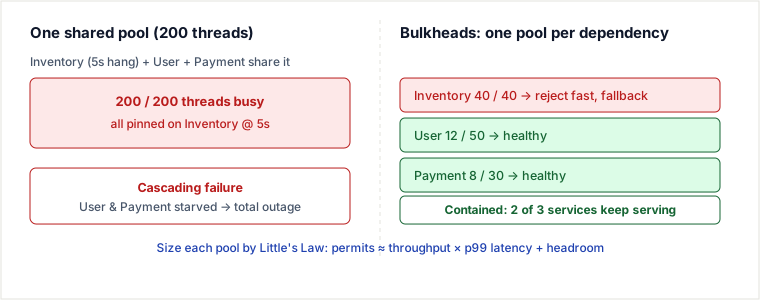
A product-page service runs on a shared pool of 200 threads and calls three dependencies: Inventory, User, Payment. Normally Inventory answers in 20 ms at 100 req/s. By Little's Law the concurrency it needs is L = λ × W = 100/s × 0.02 s = 2 threads — trivial. Then Inventory's backing store degrades and its latency jumps to 5 s. Watch the same 5 seconds play out with one shared pool versus a 40-permit Inventory bulkhead.
| Time | Event | Shared 200-thread pool | Inventory bulkhead = 40 permits |
|---|---|---|---|
| t=0s | Inventory healthy (20 ms) | ~2 threads on inventory; plenty free | ~2 permits used of 40 |
| t=5s | Inventory latency → 5 s | Demand = 100/s × 5 s = 500 concurrent calls building up | Same demand hits the 40-permit wall |
| t=7s | Pool fills | All 200/200 threads pinned on inventory; accept queue backs up | 40 permits taken; call #41+ returns BulkheadFullException in microseconds → fallback ("stock unknown") |
| t=8s | User & Payment traffic arrives | Cannot get a thread → time out. Full outage of an unrelated feature | User pool 12/50, Payment 8/30 — untouched, keep serving |
| t=8s+ | Steady state under load | Threads freed every 5 s but instantly re-taken; pool never drains → stays down | Inventory fails fast, no pile-up; when the store recovers, permits free normally |
Same failure, same load. The only variable is where the compartment walls sit.
Sizing: don't guess, use Little's Law
The right permit count is the concurrency a healthy dependency needs, plus headroom for bursts: permits ≈ throughput × p99_latency × safety_factor. For Inventory at 100 req/s and a healthy p99 of 200 ms: 100 × 0.2 = 20 concurrent; set ~40 permits (2x headroom). Too small and you reject healthy traffic during normal spikes; too large (say 200, the whole pool) and there is no wall at all — you've re-created the shared-pool failure.
Code: semaphore bulkhead
Resilience4j, failing fast when saturated (maxWaitDuration = 0):
BulkheadConfig cfg = BulkheadConfig.custom()
    .maxConcurrentCalls(40)        // permits
    .maxWaitDuration(Duration.ZERO) // don't queue; shed load
    .build();
Bulkhead inventoryBulkhead = Bulkhead.of("inventory", cfg);

Supplier<Inventory> guarded = Bulkhead.decorateSupplier(
    inventoryBulkhead, () -> inventoryClient.fetch(sku));

// 41st concurrent call throws BulkheadFullException in microseconds:
Inventory inv = Try.ofSupplier(guarded)
    .recover(BulkheadFullException.class, ex -> Inventory.unknown())
    .get();
The same idea in Go — a buffered channel is a semaphore. The default branch is the whole point: it sheds load instead of piling more goroutines onto a dying dependency.
type Bulkhead struct{ sem chan struct{} }

func NewBulkhead(max int) *Bulkhead {
    return &Bulkhead{sem: make(chan struct{}, max)}
}

var ErrBulkheadFull = errors.New("bulkhead full")

// Execute runs fn only if a permit is free; otherwise fails fast.
func (b *Bulkhead) Execute(fn func() error) error {
    select {
    case b.sem <- struct{}{}:        // acquire a permit
        defer func() { <-b.sem }()   // release on return
        return fn()
    default:
        return ErrBulkheadFull       // saturated: shed, don't wait
    }
}
Why the semaphore version alone is not enough: neither snippet can interrupt a call that hangs — the permit-holding thread/goroutine stays blocked for the full 5 s. A semaphore bulkhead bounds how many can hang, not how long. You must wrap fn with a timeout (a context.Context deadline in Go, a TimeLimiter or ThreadPoolBulkhead in Resilience4j) or the pool still drains one 5-second call at a time.
Pitfalls
- Semaphore bulkhead with no timeout. The most common mistake. It caps concurrency but can't cancel a hung call, so 40 requests still sit blocked for 5 s each — you slowed the leak, you didn't stop it. Always pair with a timeout.
- Sized as big as the shared pool. A bulkhead that can grow to the full thread count isolates nothing. If in doubt, err smaller and add a fast fallback.
- Sized too small. During a legitimate traffic spike the bulkhead rejects healthy requests, turning a latency blip into user-visible errors. Watch the "bulkhead full" rejection metric; it should be ~0 in steady state.
- Lost request context (thread-pool style).
ThreadLocalauth, MDC logging keys, and tracing spans don't cross the executor boundary. Traces break and security context silently disappears unless you explicitly propagate it. - Thread multiplication. 10 dependencies × 40 threads = 400 threads and ~400 MB of stacks doing nothing most of the time. Semaphore bulkheads avoid this; use thread-pool isolation only where you truly need interruption.
- DB connection over-subscription. Splitting into per-workload connection pools is great until the pools sum past the database's
max_connectionsand the DB starts refusing connections — a self-inflicted outage. - Bulkheads only buy time. (Keep this honest caveat from the original.) A partitioned system with a dead dependency still serves degraded, not full, functionality. Bulkheads contain blast radius; they don't make the failure go away.
When to use it — and how it differs from the circuit breaker beside it
These two patterns are constantly confused because they sit next to each other in every resilience library, but they isolate along different axes:
- Bulkhead = spatial / resource isolation. Caps concurrency regardless of whether calls are succeeding. It fires on saturation. Its unique strength is defending against a dependency that is slow but not erroring — the case a circuit breaker is blind to, because there are no errors to trip on.
- Circuit breaker = temporal isolation. Watches the error/timeout rate and, once past a threshold, stops calling the dependency entirely for a cool-down window so it can recover. It fires on failure signal, and only after failures have accumulated.
They are complementary, not alternatives — production stacks layer them: timeout (bound one call) → bulkhead (bound concurrent calls) → circuit breaker (stop calling a failing dependency) → fallback (degrade gracefully).
Choose a thread-pool bulkhead when calls can hang, client timeouts are unreliable, and you need to stay responsive while the dependency's pool is fully blocked — you accept thread overhead and context-propagation work for real isolation.
Prefer a semaphore bulkhead when calls are fast, reliably time-bounded, and high-throughput, so per-call thread overhead would dominate — but you must add an explicit timeout.
Skip the bulkhead and use just timeout + circuit breaker when the service has essentially one dependency (nothing to isolate from), or when every path shares fate anyway — the extra pools add tuning burden and rejection-tuning risk for no isolation benefit.
Takeaways
- A bulkhead isolates a scarce resource (threads / connections / permits) per dependency so a hang exhausts only its own pool — the mechanism, not the analogy, is a fixed concurrency cap.
- The threat is latency, not errors: slow calls pin threads, threads run out, unrelated features die. Size the cap with Little's Law:
permits ≈ throughput × p99 latencyplus headroom. - Semaphore bulkheads are cheap but can't interrupt a hang — always add a timeout. Thread-pool bulkheads give real isolation at the cost of threads and lost request context.
- Bulkhead (caps concurrency on saturation) and circuit breaker (stops calls on error rate) solve different problems; layer timeout → bulkhead → circuit breaker → fallback.
Re-authored and deepened for this guide. Sources: Michael T. Nygard, Release It! (2nd ed.) — Bulkhead and Circuit Breaker stability patterns; Netflix Hystrix wiki (thread-pool vs semaphore isolation, historical defaults); Resilience4j documentation (Bulkhead, ThreadPoolBulkhead, TimeLimiter); Microsoft Azure Architecture Center — Bulkhead pattern; John D. C. Little, "A Proof for the Queuing Formula L = λW" for the sizing derivation.
🤖 Don't fully get this? Learn it with Claude
Stuck on The Bulkhead Pattern A Solution? Open Claude, copy a block below, and it'll teach you this exact concept — visually and interactively.
Progressively stronger hints — you still solve it.
I'm working on the problem **The Bulkhead Pattern A Solution** (System Design). Give me a HINT LADDER: start with the tiniest nudge, then wait. Only reveal the next, stronger hint when I ask. Do NOT show the full solution unless I type 'show solution'. Keep me doing the thinking. If you're unsure or a claim isn't standard, say so and reason from first principles instead of guessing.
See the technique, not just code.
Explain the optimal approach to **The Bulkhead Pattern A Solution** with a VISUAL walkthrough: trace it on a small concrete example using ASCII art / a step-by-step diagram, narrate what changes each step, then give time & space complexity with a one-line derivation. If you're unsure or a claim isn't standard, say so and reason from first principles instead of guessing.
Catch bugs, edge cases, sub-optimality.
I'll paste my solution to **The Bulkhead Pattern A Solution**. Review it for correctness, missed edge cases, and time/space complexity, then coach me toward the optimal — don't just rewrite it. Ask me to paste my code now. If you're unsure or a claim isn't standard, say so and reason from first principles instead of guessing.
Lock in recognition with look-alikes.
Give me 2 problems that use the SAME underlying pattern as **The Bulkhead Pattern A Solution**. For each, let me attempt first, then review my answer and name the trigger signal that reveals the pattern. If you're unsure or a claim isn't standard, say so and reason from first principles instead of guessing.